
What is the one thing that business owners, entrepreneurs, startups never have enough of?
Ideas? Nah.
Money? Nope.
Good advice? Hopefully not.
The one thing you will never enough off when you are in charge of a business is TIME. So, the smart entrepreneur knows how to focus their time and effort on the most important tasks to get the most results from.
4 hours and 4 steps to improve your website for more results.
We designed this 4 hour program to help out stressed website owners, marketing people and all the rest of the entrepreneurs. We will show you how to improve your website in only 4 hours.
So close your mail program, set your phone on do not disturb, shut down your social media programs and start your timer!

Step 1: Identify your most important pages
Timing: 30 minutes | Time left: 3 hours 30 minutes
Remember, we only have 4 hours, so it is crucial to prioritise your effort on the most important pages.
Often these are the most important pages on a website:
– Your Homepage
– Your Conversion pages (e.g the checkout process or sign up page)
– Your Contact page
– Your most valuable content pillar pages (Don’t know what content pillar pages are? See a great explanation from Hubspot here.)
But as you know, businesses are different and users have different needs, so there is a better way to make sure that you identified your most important pages.
How to identify the most important pages
To make sure that you will focus on the most important pages, you can use your Google Analytics tool to identify them.
We will use two characteristics for this: high traffic and high engagement.
What is engagement?
Engagement is basically anything a user does on a certain page, like reading the article, or watching a video or taking the content in that you are providing on that page. The assumption we are using here is that the more time a user spends on a specific page, the higher chance you have that this user will come back again and/or turn into a customer.
Step-by-Step: How to identify the most important pages
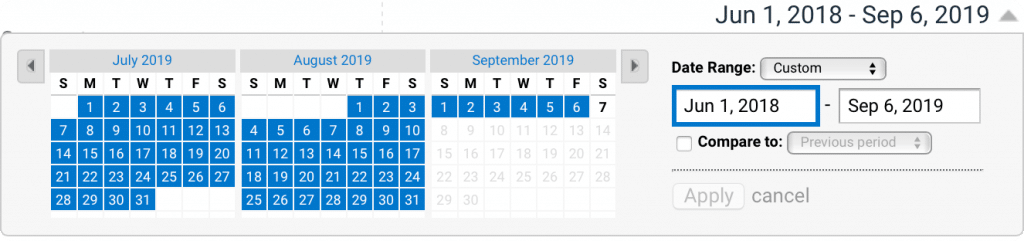
Set a very long date in Google Analytics
One year is a very good time range. If that’s not possible take the longest time range you have.
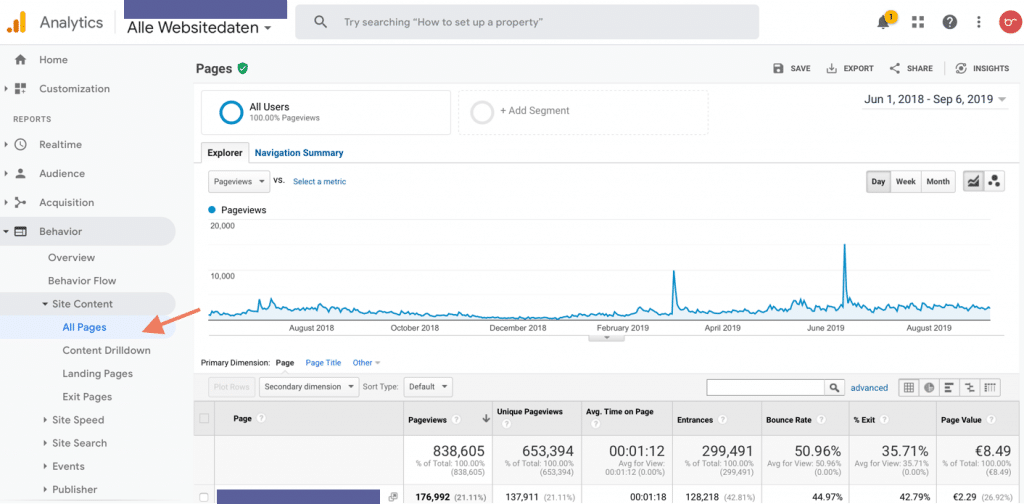
Go to Behavior > Site Content > All Pages
This will show you all pages on your website.
Click on the Comparison Icon
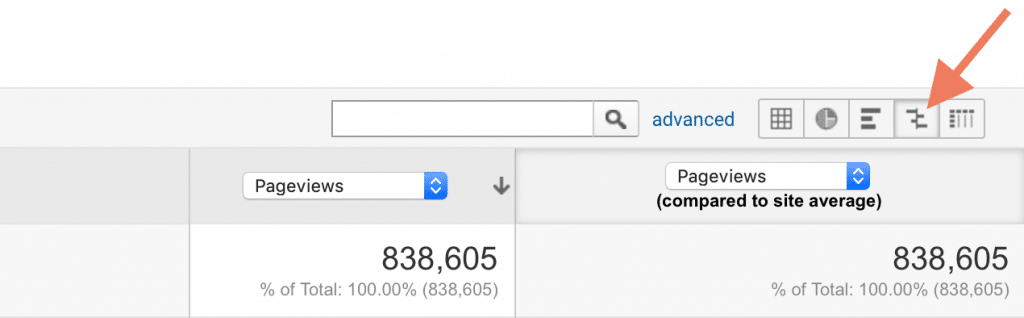
Choose Average Time on Site as the comparison set

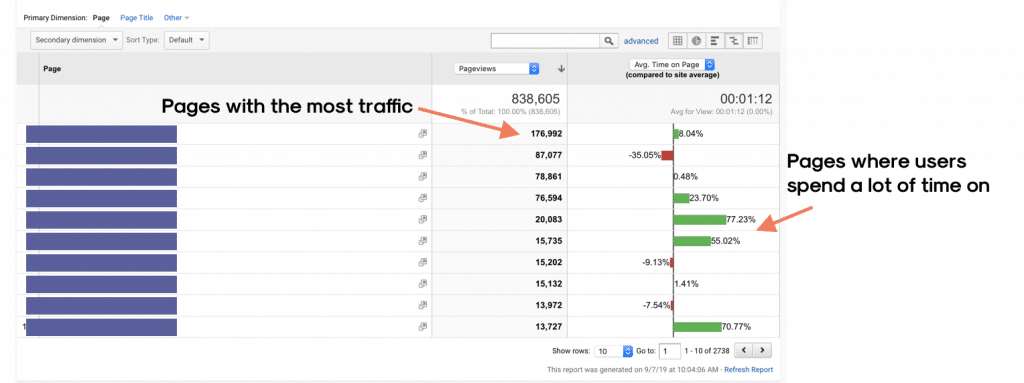
Voilà. You can now see which pages have a lot of traffic and where your users spend the most time on.
On the left side, you can see your highest trafficked pages.
On the right, the green bars are indicating which pages visitors are spending more time on.
Step 2: Set up your optimisation framework
Timing: 45 minutes | Time left: 2 hours 45 minutes
With your most important pages at hand, we can now start to make them as user-friendly as possible. Remember that a successful website serves one purpose: Helping your users to find what they were looking for.
We created a framework to lay out what your users are looking for on different pages or steps in the conversion funnel. For this, the frameworks answers threes questions.
Question 1: What is the user looking for?
As you can’t just go over to your user to answer “Hello, what are you looking for, how can I help?”, we have to be smart to identify their purpose when they visit a page on your website. You can answer this question by identifying the source the user came from.
Are they coming from a Facebook ad or a Google ad which promotes a specific product or service? Did they find your page through a Google Search? What were they searching for? Did you send them to your page through your Newsletter? Or did they navigate from another page?
Question 2: What is the purpose of the page?
Each page should have one purpose. For instance, the contact page should help users to contact you. A product page should show all details that a user needs to know about a product. Focusing on delivering a specific information will make sure that your users find what they are looking for.
Question 3: What action should the user take next?
This is the call-to-action part, so asking your users to do something. You never want your users to leave your page without any interaction. Think about it this way: You don’t want your users to check out a product page and just leave, or read your blog post and close the page again. Your task as the website owner is to guide them and tell them what they should do next. The call-to-action has to be so clear, that they don’t even have to think about the next step. It just happens naturally.
Step-by-Step: Define the user intent for the most important pages
Get the user intent framework document
You can access the document here.
Make a copy (don’t requess access) and rename it.
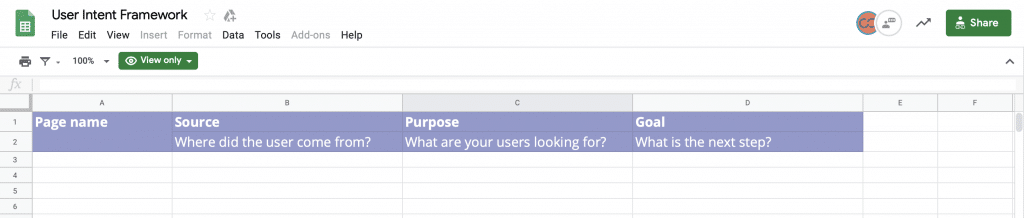
Fill the document with your most important pages
Take the pages you identified in step 1 and put them into the first column “Page Name”.

Fill out the Source, Purpose and Goal
The Source often directly correlates with the purpose or the Goal. For instance, if a user sees a Google Ad and visits a Landingpage the purpose is directly linked to the Ad he saw a second before.
You can have more than one Purpose or Goal. But if you see that there are more than 3 per page then chances are that your users don’t understand what you want to communicate and what they should do next.
So use this framework to also understand if your purposes and goals are clear.

Step 3: Review your pages
Timing: 1 hour | Time left: 1 hour 45 minutes
Now it’s time to be 100% honest to yourself. Go to each of your important pages and review them. Try to put yourself in your user’s shoes. Do your users find the information they are looking for quickly and with ease or do they have to work hard for it? Is there a friction between what the source (Google Ads, etc.) promised them and what they see on the landing page? Can they clearly understand what the next step should be?
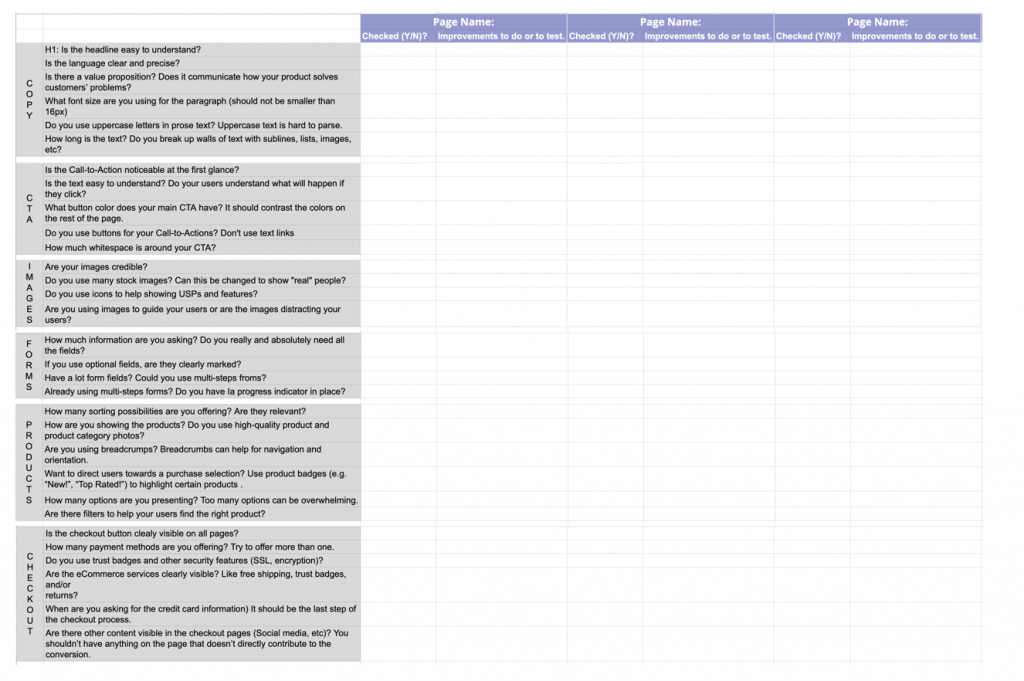
In order for you to be able to review the pages, we created questions and review points to apply. You can find them in the second worksheet.
Step-by-Step: Review your pages
Answer and fill out the questions in Sheet 2 “Review”
Not all questions are relevant for each page. Check the relevant questions and feel free to add important point to your review sheet.
Fill out the to-dos to improve the page.
Sometimes, it is very clear what needs to be improved. Enter these points. If the improvement is not so clear, define what needs to be tested.
Step 4: Improve your pages
Timing: 1 hour 45 minutes | Time left: 0
You should have a clear image of what needs to be changed on your pages right now. Take the to-dos from your spreadsheet and start ticking off your to-dos.
Before you finish, double check with the user-intent sheet. Ask yourself if your users understand the pages better and if the path they should take is clear.
Track and improve regularly.
Of course, you want to see if these 4 hours are spent on the right tasks. So, we highly recommend to track your results. Have a look at your Google Analytics metrics before and after the improvements and make sure to review if the numbers go up.
Not a Google Analytics fan? Don’t worry. You can find the most important metrics to track in this blog article.